If you sell merchandise for cash then it's important that you know how to verify a 100 dollar bill. In this article we'll go over counterfeit money detectors and also how to use the eye test.
Counterfeit Money Detectors
The easiest way to find out if a bill is real or not is to use a counterfeit money detector. These products will automatically tell if you have a real bill or a fake.
Counterfeit detector pens are the most affordable money detector products. These small devices retail for less than 10 dollars. But don't let the price deceive you, these pens are effective and many people swear by them.

There are more advanced money detectors that scan the entire bill. Most of these money detectors retail for around $50-100. If you run a business then it may be wise to invest in one of these products.
Note that most of these products are not always 100% accurate. This is why it's also recommended that you use the eye test in addition to using a money detector.
Eye Test
When doing the eye test, you'll need to verify that the bill looks authentic and that all the security features are present. The verification process is quick and simple once you know what to look for.
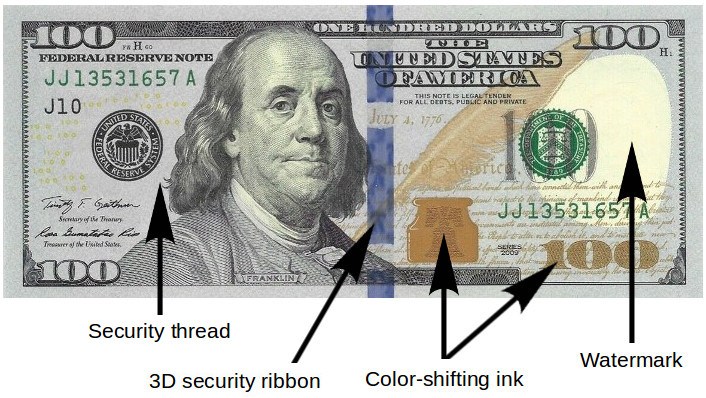
1. Verify the Watermark
When you hold the bill up at an angle, you should see a portrait of Benjamin Franklin on the right side of the bill where the clear section is. The watermark was first added to the $100 bill in 1996.
2. Verify the Color-Changing Ink
Color-changing ink can be found on the obverse side of the bill in two different locations- on the liberty bell and on the numeral "100" located on the lower right corner. When you hold the bill up at an angle, the color should change from copper to green. Color-changing ink was first added to the $100 bill in 1996.
3. Verify the 3D Security Ribbon
The 3D security ribbon is the vertical blue ribbon that can be found on the obverse side of the bill. When you look closely, you should see small numeral 100s and liberty bells inside the ribbon. When you tilt the ribbon, the numbers and liberty bells should shift sideways. The 3D security ribbon was added in 2013.
4. Verify the Security Thread
The vertical security thread can be seen when you hold the bill up at an angle. The number 100 and the abbreviation USA can be seen multiple times on the security thread. It's also possible to spot the security thread under a UV black light. The security thread was first added to the $100 bill in 1990.
5. Examine the Microprinting
There are tiny words printed on the bill in a few different locations. In order to see the microprinting you may need a magnifying glass. On the modern series bills, the microprinting can be found on Franklin's collar, the bottom of Franklin's portrait, and to the right of the brown quill. Microprinting was first added to the $100 bill in 1990.
Conclusion
If you use a counterfeit money detector and/or use the eye test, then you should be able to accurately determine whether or not your bill is real. We recommend buying a money detector to give you more peace of mind. If you own a business then a money detector could save you a lot of money over time.